Flight log
Pre-solo ground school
I'm ready for more circuits, but the weather always wins. This Wednesday's flights become ground school. I'm starting my preparation for the pre-solo exam, and practicing my weight and balancing calculations.
Today, we planned to have two more circuit training sessions. However, the weather had other plans. So, I executed Plan B: ground school to prepare for the pre-solo written exam and practice the plane loading calculations.
Here are the details.
Weather
Today's weather was unsuitable for circuits for a beginner like me. As I looked at the weather forecast on Tuesday night on the BOM website (Bureau of Meteorology) for Camden, I knew there was a good chance for one or both flights not to go ahead.
The BOM provides historical data of their forecasts and observations, and (below) you can see that on September 20, gust winds were up to 59 Km/h (31 kt).
Recorded observations by BOM for Camden.
In the BOM observation, you can also see the wind speeds at 9 am and 3 pm and the QNH. The indicated speeds are much lower than I witnessed at the airport at 9 am. The QNH is also low, meaning that the air was thinner, and therefore, the aircraft performance would be lower compared to what I had experienced in previous flights (where QNH had always been above 1013).
Before I continue, let's take a close look at QNH.
Aside: What is QNH? Why is it important?
QNH is the current sea-level pressure at a specific location, expressed in inches of mercury (inHg) or millibars (hPa). Pilots use QNH to calibrate their altimeters for accurate altitude readings. Incorrect altitude readings can lead to controlled flight into terrain (CFIT) or airspace violations.
Accurate QNH settings help determine the true altitude, which is crucial for engine performance calculations. Engines are sensitive to changes in air pressure, and incorrect QNH can lead to sub-optimal engine settings.
Aircraft performance charts, which include data on takeoff and landing distances, climb rates, and fuel consumption, are often based on pressure altitude. Accurate QNH ensures the pressure altitude is correctly calculated, allowing for more precise performance estimations.
Takeoff and landing performance calculations, such as required runway length and V-speeds, are influenced by altitude. Incorrect QNH settings can result in miscalculations, potentially leading to runway overruns or insufficient climb rates.
Accurate altitude readings, facilitated by correct QNH settings, are essential for weight and balance calculations. These calculations affect the aircraft's centre of gravity, impacting stability and control.
Stall speeds can vary with altitude. Accurate QNH settings ensure that the aircraft's altitude matches the altimeter, allowing pilots to maintain safe airspeeds, especially during critical phases like takeoff and landing.
The correct use of QNH is integral to various aspects of aircraft performance, from engine efficiency to aerodynamic characteristics. It plays a critical role in ensuring safe and efficient flight operations.
Let's continue
Ok, that's enough about the importance of QNH. For today's flight, the plan was to do circuits. This means flying around the airport. The QNH, while always important, is not the deciding factor here. A few millibars, more or less, would mean a faster or slower climb rate, something that I can handle.
The deciding factor is wind speed and gusts. If the wind speed, constant of gusty, is above a specific limit, then the flight can't proceed because either (1) I am not trained to deal with such winds, and (2) the aeroplane is not designed to fly with such winds.
At the airport, I was looking at the location briefing from Airservices Australia. Bob was also listening to the airport ATIS service. Here is what the briefing looked like at 9:20 am.
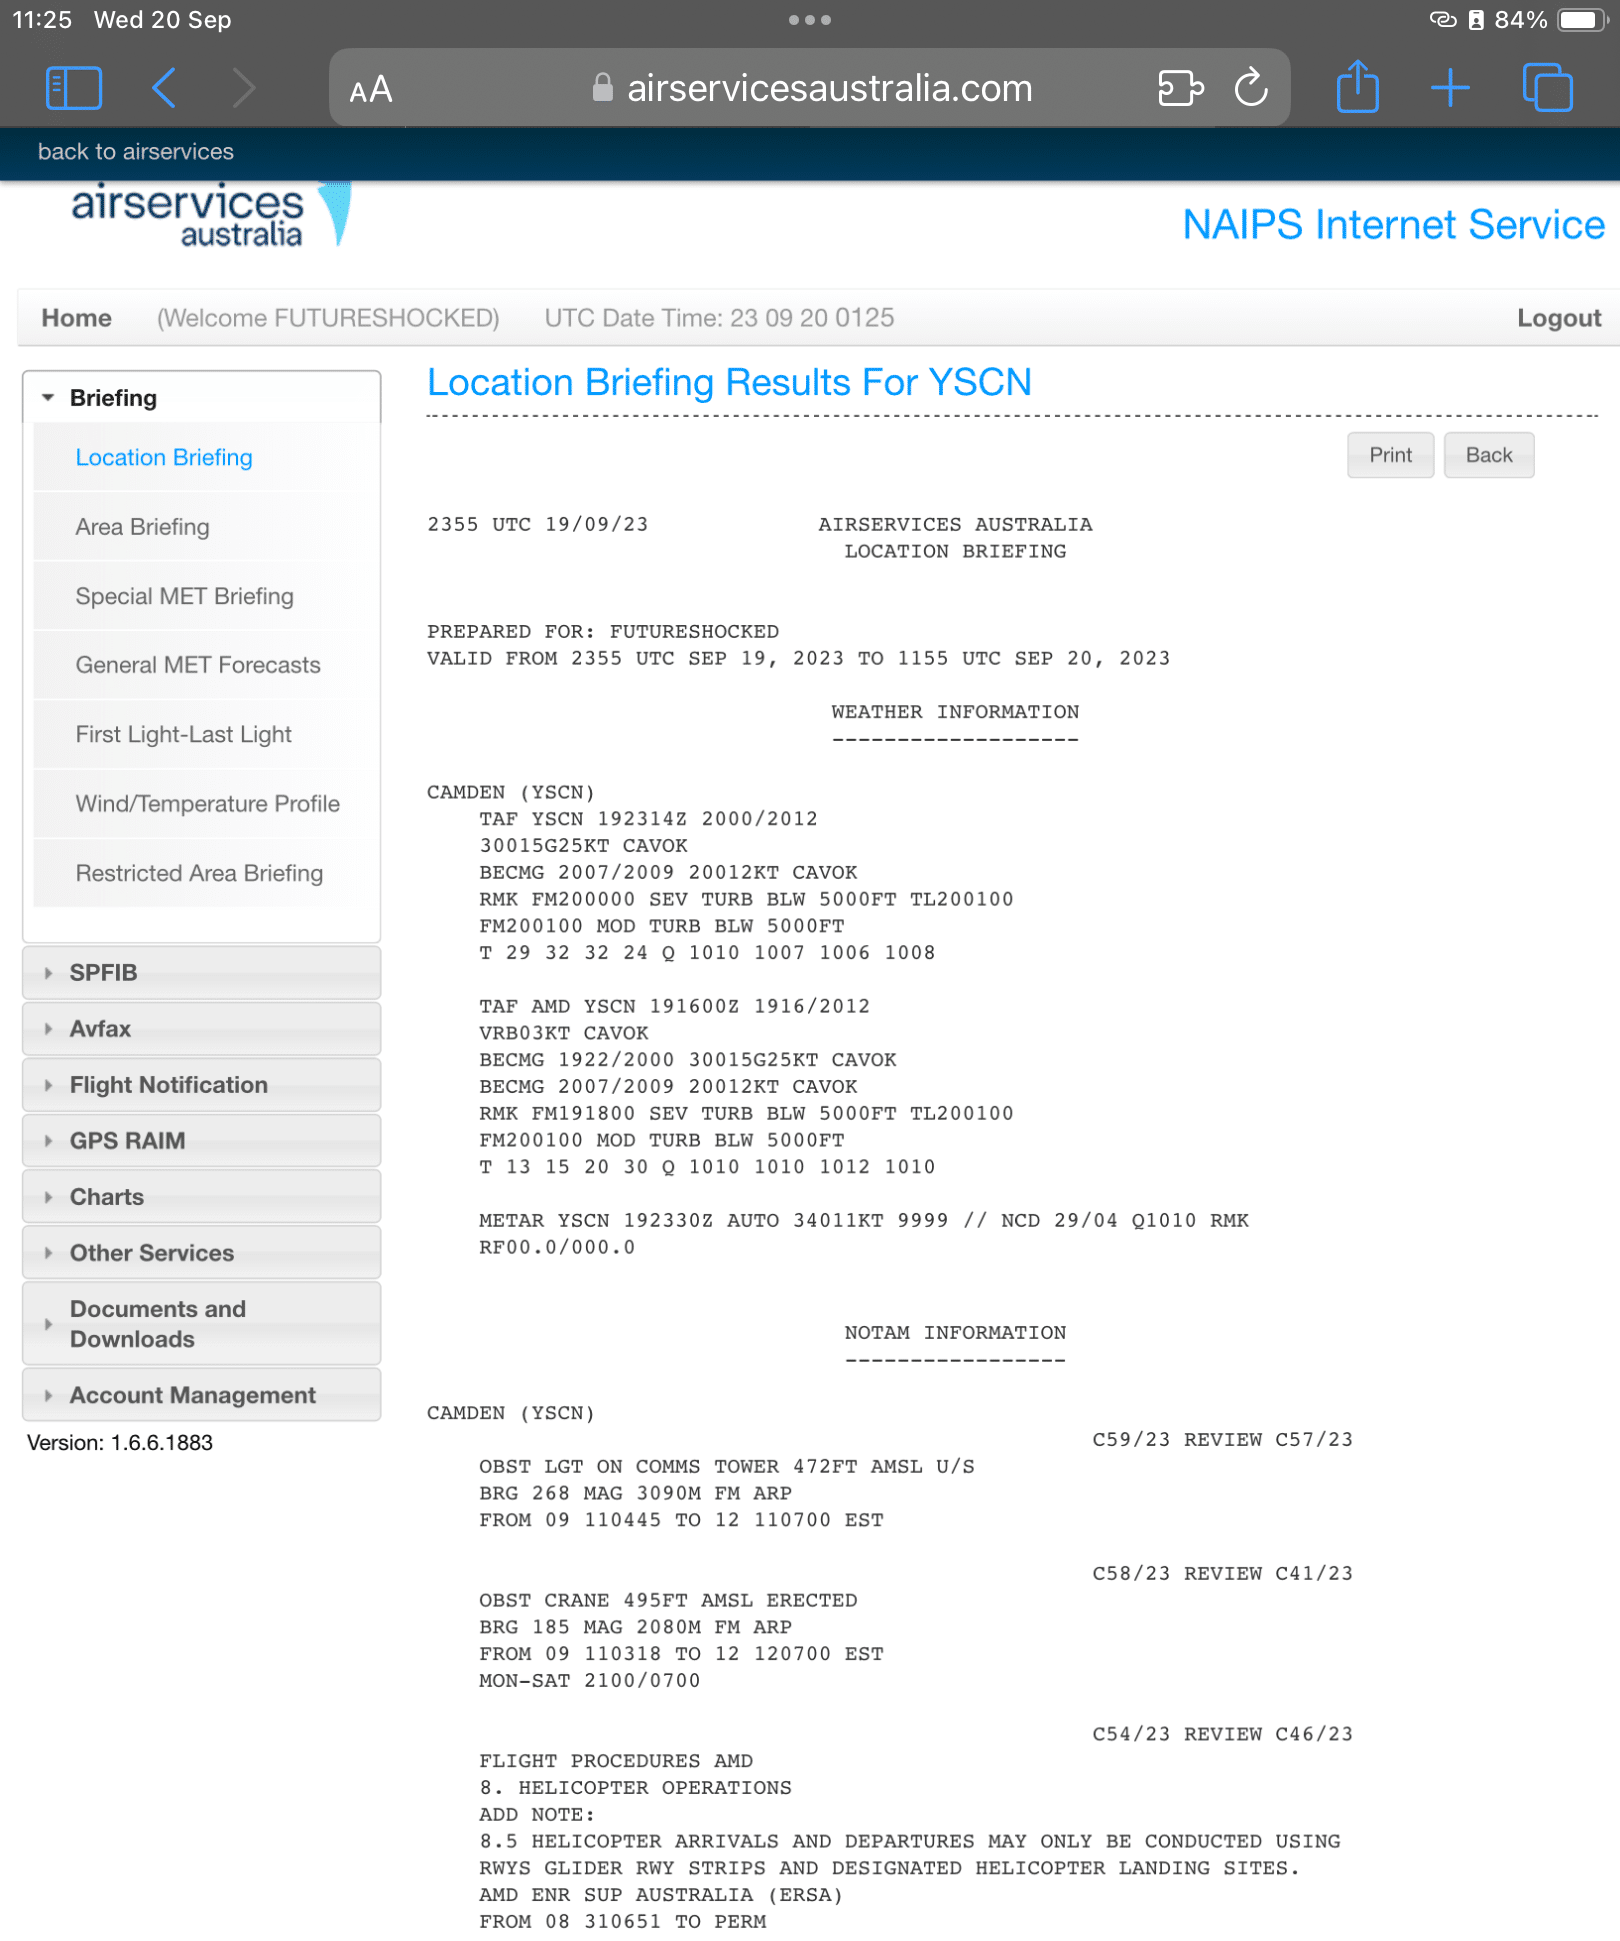
Location briefing for Camden on the morning of my (canceled) flights.
TAF (Terminal Aerodrome Forecast)
- Issued Time: 19th of the month at 23:14 UTC, valid from 20th day 00:00 UTC to 20th day 12:00 UTC. (20th of the month at 09:14 AEST, valid from 20th day 10:00 AEST to 20th day 22:00 AEST.)
- Initial Conditions: Wind from 300 degrees at 15 knots, gusting up to 25 knots. Ceiling and visibility okay (CAVOK).
- Becoming: Between 07:00 and 09:00 UTC (Between 17:00 and 19:00 AEST), wind will change to 200 degrees at 12 knots. CAVOK conditions will remain.
- Remarks:
- From 00:00 UTC (10:00 AEST), severe turbulence below 5000 feet until 01:00 UTC.
- From 01:00 UTC (11:00 AEST), moderate turbulence below 5000 feet.
- Temperature and Pressure:
- Temperature: 29°C, 32°C, 32°C, 24°C
- Pressure: 1010 hPa, 1007 hPa, 1006 hPa, 1008 hPa
TAF AMD (Amended Aerodrome Forecast)
- Issued Time: 19th of the month at 16:00 UTC, valid from 19th day 16:00 UTC to 20th day 12:00 UTC. (20th of the month at 02:00 AEST, valid from 20th day 02:00 AEST to 20th day 22:00 AEST.)
- Initial Conditions: Variable winds at 3 knots. CAVOK.
- Becoming:
- Between 22:00 and 00:00 UTC (Between 08:00 and 10:00 AEST), wind will change to 300 degrees at 15 knots, gusting up to 25 knots. CAVOK conditions will remain.
- Between 07:00 and 09:00 UTC (Between 17:00 and 19:00 AEST), wind will change to 200 degrees at 12 knots. CAVOK conditions will remain.
- Remarks:
- From 18:00 UTC (04:00 AEST), severe turbulence below 5000 feet until 01:00 UTC.
- From 01:00 UTC (11:00 AEST), moderate turbulence below 5000 feet.
- Temperature and Pressure:
- Temperature: 13°C, 15°C, 20°C, 30°C
- Pressure: 1010 hPa, 1010 hPa, 1012 hPa, 1010 hPa
METAR (Aviation Routine Weather Report)
- Issued Time: 19th of the month at 23:30 UTC (20th of the month at 09:30 AEST).
- Conditions: Automatic report, wind from 340 degrees at 11 knots, visibility 9999 meters, no significant cloud detected.
- Temperature/Dew Point: 29°C/4°C
- Pressure: 1010 hPa
- Remarks: Rainfall 0.0 mm
This decrypted report provides detailed weather conditions, including wind, visibility, turbulence, temperature, and pressure, essential for flight planning and operations.
In red, I have marked the wind conditions that made us decide not to go ahead with the flights. Aside from the strong, sustained and gusty winds, there was also severe turbulence. Scouts don't allow their planes to fly in severe turbulence because of the stress that this imposes on the airframe.
Last but not least is the wind direction. The TAF indicated sustained winds from 300° to 340°, making them almost perpendicular to the runway. See this diagram:
The wind on the day was perpendicular to the runway.
Quick definition: CAVOK, meaning "Ceiling and Visibility OK". This term is used in weather reports to indicate that the weather conditions are clear, with no significant weather phenomena affecting visibility, cloud cover, or ceiling. CAVOK is commonly found in METAR and TAF reports.
It simplifies the report by replacing detailed information on visibility, cloud cover, and significant weather phenomena when conditions are clear. CAVOK indicates optimal flying conditions, which is especially useful for Visual Flight Rules (VFR) operations. It also simplifies flight planning and decision-making for pilots and air traffic controllers.
The criteria for CAVOK to apply are:
- Visibility: 10 kilometers or more.
- Cloud Cover: No cloud below 5,000 feet or the highest minimum sector altitude, whichever is greater.
- Weather Phenomena: No cumulonimbus or towering cumulus clouds, and no significant weather phenomena such as precipitation, thunderstorms, or fog.
I can deal with a light crosswind, say 2-3 kts, but not at 15 kt.
So, I'm grounded today. Let's switch to ground school.
Pre-solo test
Given I had time to work on "theory", Bob said I should prepare for the pre-solo written test. This multiple-choice test evaluates my knowledge of rules, procedures, and general skills needed for someone doing their first solo (i.e. without the instructor in the cockpit) flight.
Here are some example questions from a sample test I did last week:
Q1. When the aerodrome QNH is set, during taxi, the altimeter should read:
a. zero.
b. airfield elevation.
c. vertical distance AGL.
d. vertical distance AAL.
Q2. An aircraft stall-warning device will:
a. indicate that a stall has occurred.
b. cause a light to come on and a horn to sound after the aircraft stalls.
c. indicate that the aircraft is approaching the stall at any attitude.
Q3. The minimum horizontal distance from cloud for a fixed-wing aircraft, operating in Class G airspace, is:
a. 1,500 meters
b. 1,500 ft.
c. 1,000 ft.
d clear of cloud
I plan to take this test between the 8- and 12 pm flights next week. To prepare, I'll work on the practice exam that Bob gave me and review volume one of the Tait book, and the CASA VFRG (Visual Flight Rules) Guide. That's the rest of Saturday :-).
Load data sheet
Various calculations were a big part of my preparation for the RPL test I took in July. These are calculations done with the help of charts that work out things such as the takeoff distance required, landing distance required, and the safe aircraft loading and balancing.
The charts I used to do these calculations for the RPL test were generic, or at least they did not mention a specific aircraft type. I will have to use the specific loading chart for the Cessna 172 R.
In the photo below, you can see what the weight and balance worksheet looks like for the Cessna, with my siblings on it:
My weight and balance calculations.
Based on my calculations, I cannot take Leo, Ari and Bob on a ride with more than 15-20 minutes of flight time, 30 minutes of emergency fuel, and 10 minutes of arrival fuel. The weight is too much and renders the aircraft out of balance. Accurate weight and balance calculations are crucial for maintaining an aircraft's stability during all phases of flight, including takeoff, cruising, and landing. These calculations ensure that the aircraft operates within its certified limitations, as defined by aviation authorities, making it both a safety requirement and a legal obligation.
Proper weight and balance also directly affect performance metrics such as takeoff and landing distances, climb rates, and fuel efficiency. Knowing the accurate weight is essential for calculating the required fuel load, as carrying excess fuel increases weight and reduces efficiency, while insufficient fuel poses a risk.
The balance aspect ensures that cargo, passengers, and fuel are distributed in a way that maintains the aircraft's centre of gravity within allowable limits, as an improperly balanced aircraft can be difficult to control.
Accurate weight and balance data are essential for executing contingency maneuvers like emergency descents or diversions to alternate airports in emergencies.
Finally, these calculations allow adaptability to changing conditions, such as fuel burn during the flight.
Most pilots today use software and their tablets to do these calculations quickly. Enter the weights and locations of passengers and baggage, and the software will provide fuel allowances and performance and fuel burn rate for your plane. But I have to do these calculations on the exam using the worksheet and a basic calculator; no fancy software is allowed.
I feel confident I know how to do these calculations, but I will do more practice before the exam next week, just to be sure.
Cheat sheet v2
I have reworked my cheat sheet, to the latest version 2. The changes are:
1. Added a Notes box in place of the airport map. In version 1, I found that I needed to take notes during the flight (record ATC information, or Davide's instructions). A notes box is more useful than the map.
2. Added some more data in the IAS & RPM's box.
3. Fixed errors, in the Radio Calls and IAS & RPMs boxes.
4. Used smaller box headers with black background for better optics.
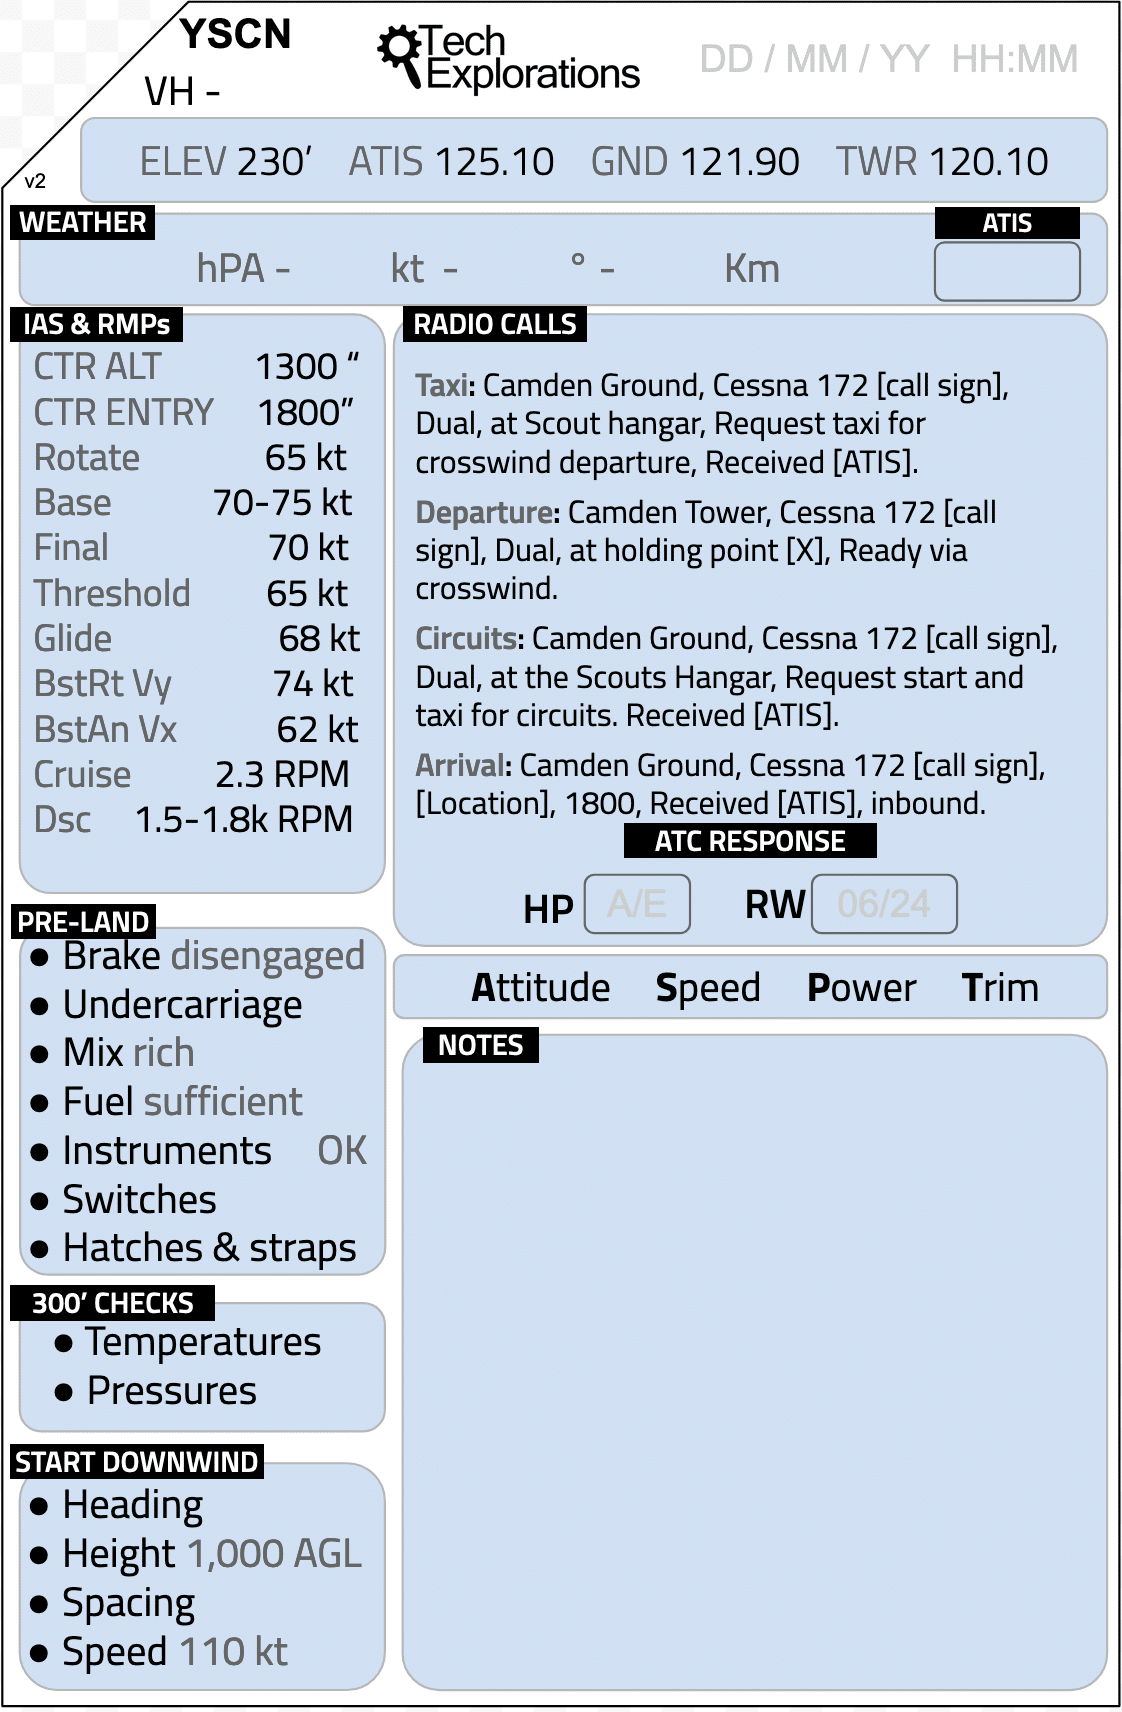
If you want a copy, go here (Google Drawing document).
Go-pro overheat fix hack
In my previous flights, my Go-pro (Hero 10) overheated and stopped recording my flights' last 10-15 minutes. That's annoying because I could not get a video recording of the last "full-stop" landings.
So, I did a small hack to deal with the overheating. I attached four small aluminium heat sinks to the camera using thermal pads. The locations where I attached the heat sinks were the only ones that did not have a button or microphone opening.
In my testing, the camera could record without overheating for 1:15h until the batter was exhausted. I'll do a proper test next week, but I am confident I can record the entire flight.
I also purchased a new Go-pro (Hero 12) that is more tolerant to heat issues than Hero 10. I will also need a mount.
Ok, that's it for today's log. I have some study to do 🙂
Don't miss the next flight log
Leave your email address by clicking on the button below, and I'll let you know as soon as I publish my next flight log. No spam, ever.
Watch this video to get the gist of this log page.
The wind sock at upwind end of runway 06.
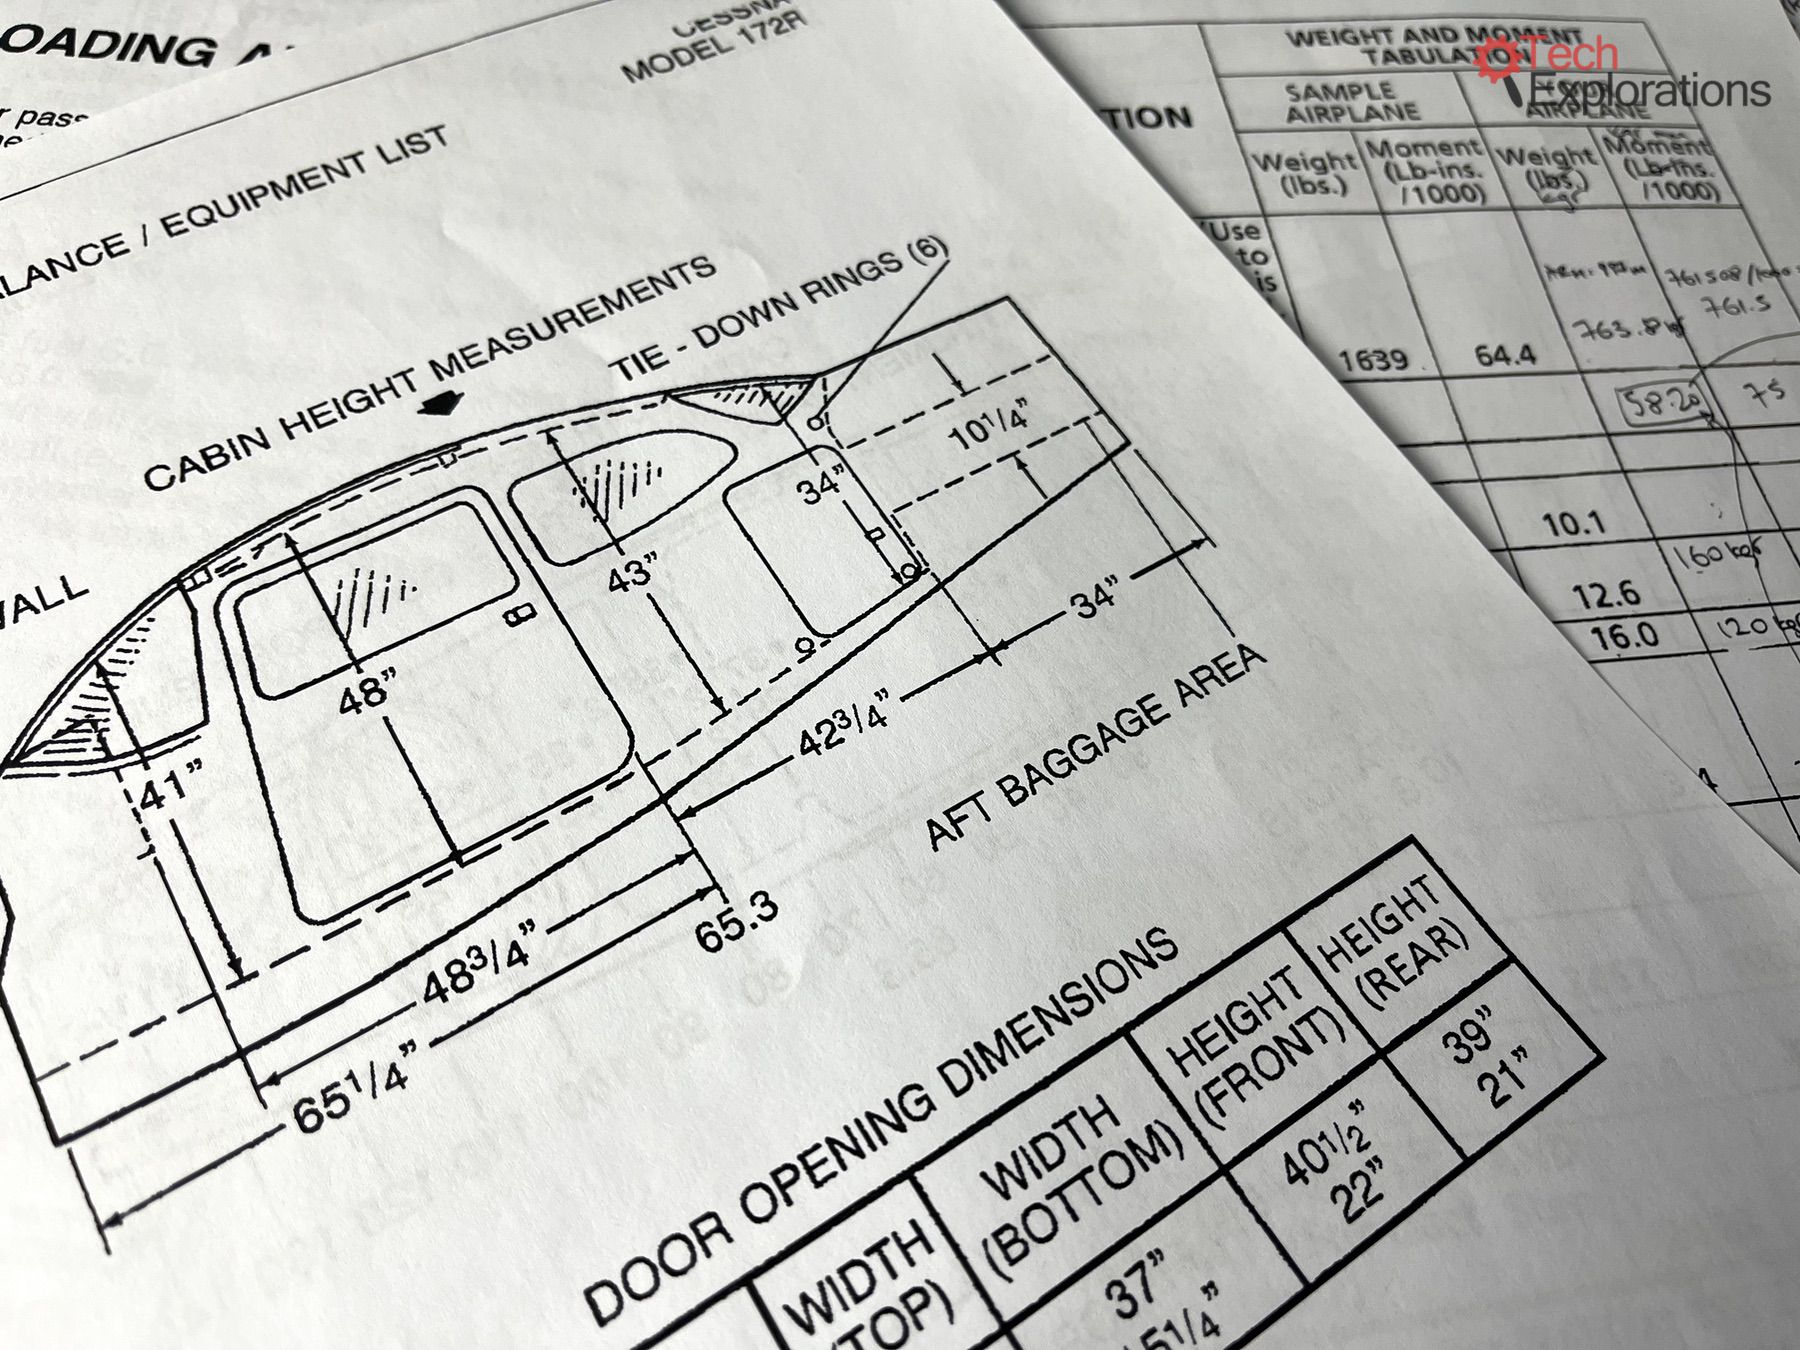
Learning how to do the loading calculations using the Cessna 172 R load data sheet.
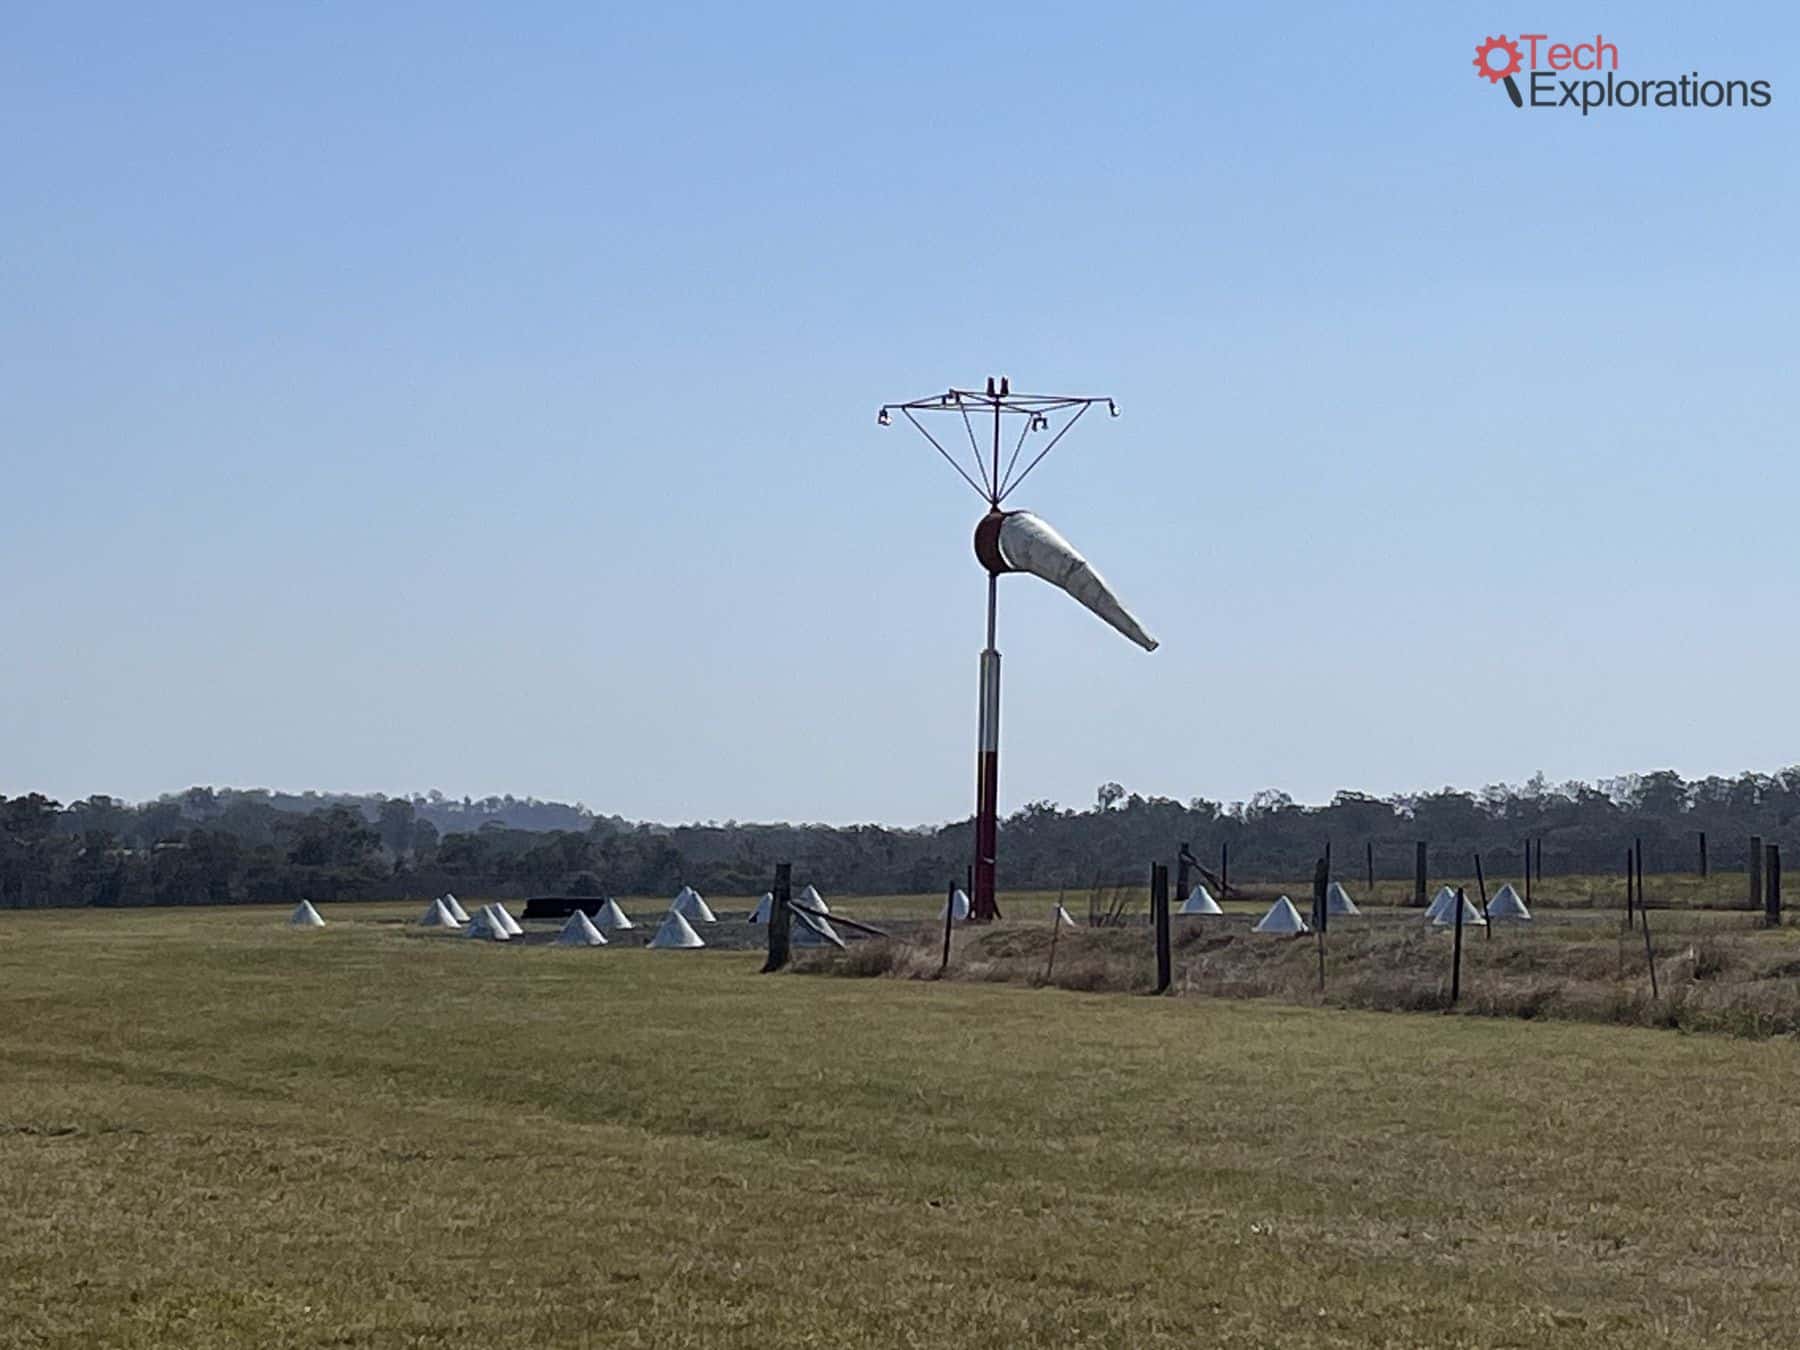
Windsock shows strong crosswind on the 06/24 runway.

